Looking for how to log in to Helium 10?
This will be a step-by-step walkthrough on how you can log in to Helium 10.
Helium 10 is an Amazon business management tool designed to assist Amazon sellers in optimizing their businesses. It is packed with features to help you improve your experience and profits as an Amazon seller, such as product research tools, keyword assistants, and inventory management. .
Let’s get started.
How to Log in on Helium 10?
Logging in to your Helium 10 account is a straightforward process. Follow these simple steps to log in to Helium 10:
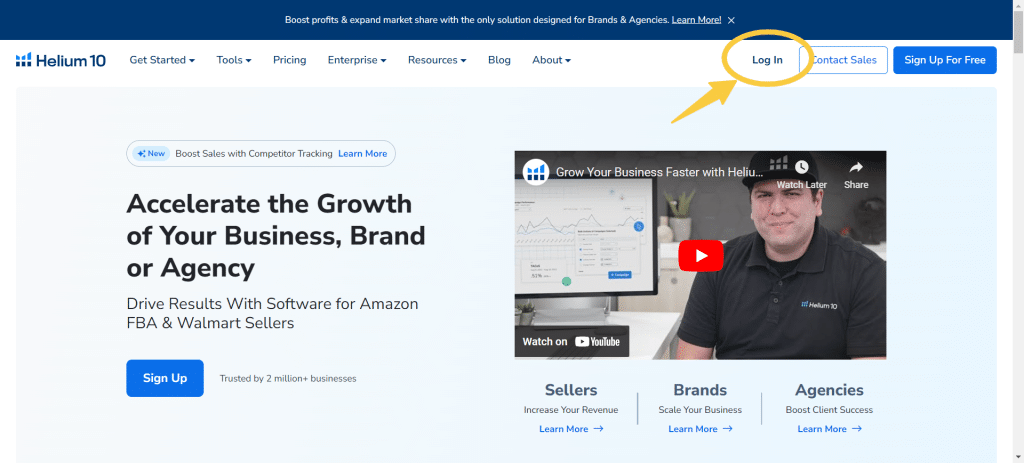
STEP #1. Open your preferred web browser & visit the Helium 10 Website.
STEP #2. Locate the Login Button: Look for the “Log In” button at the top right corner of the homepage.
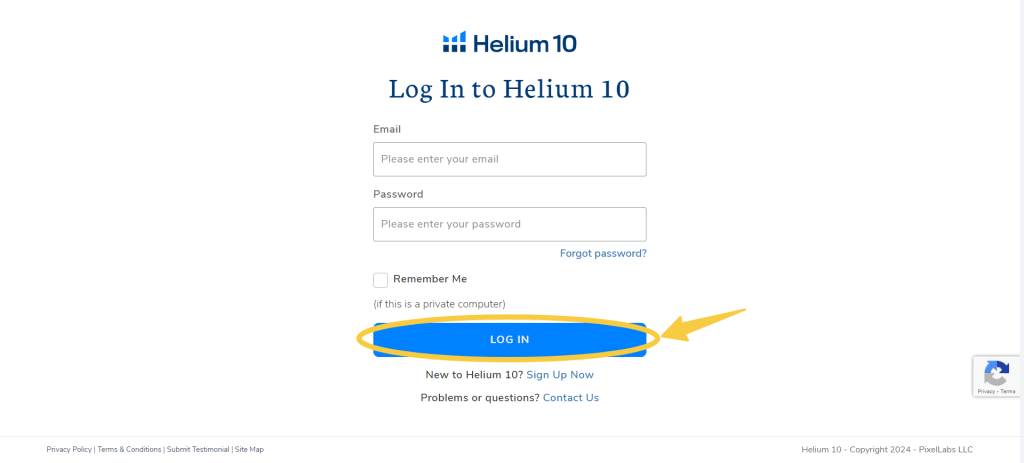
STEP #3. Enter Your Credentials: Click the “Log In” button to be directed to the login page. Enter your registered email address and password in the provided fields.
STEP #4. Click on Login: After entering your credentials, click the “Log In” button to access your Helium 10 account.
With that, you will be successfully logged in and redirected to your Helium 10 dashboard, where you can access all available tools and features.
It is that simple.
Once you have activated your account, Helium 10 might ask questions if you are a new user to personalize your journey on Helium 10. These include:
- Identity verification: Helium 10 will ask you to choose from a list of options to understand your need for the tool. The options include
Seller: I currently sell on Amazon.
Brand: I sell on my brand’s website, multiple e-commerce platforms (e.g., Amazon, Walmart, Instacart, Target), and directly to retailers.
Agency: I work with multiple brands that sell on Amazon within an agency.
Consultant: I work as a consultant to support multiple brands that sell on Amazon.
Aggregator: I work for a company that acquires brands that sell on Amazon.
I have not started selling on Amazon yet.
- Connect your Amazon business account to Helium 10: Next, you will be prompted to connect your business account to Helium 10 by pressing the Connect to Seller Central button at the bottom of the page.
- Choose a Selling Region: Once you have connected your account, choose a region your business covers. The options include North America, Europe, and Asia.
- Initiate in Amazon Central: Once you have chosen your region, press Imitate in Amazon Central. You will be redirected to your Aamzon Login window, where you can enter your credentials and get started with Helium 10.
- Enter your Business Details: You will also be prompted to choose an option for your monthly revenue. Choose the appropriate option and Press Next.
- Choose a Helium 10 pricing Plan: Finally, you will be asked to choose a suitable plan or use Helium 10 for free.
You can upgrade to any Helium 10 pricing plan at any time. You also have lifetime access to the Helium 10 free trial account with limited features.
As of 2024, the pricing plans of Helium 10 are:
- Free Plan: Helium 10 offers a free plan with limited access to its tools and features. You get lifetime access to most of its features without any cost, although for restricted access only.
- Starters Plan: This plan is for new Amazon sellers. It comes with most of the advanced features and is priced at $39/month if billed monthly or $29/month annually.
- Platinum Plan: This plan offers additional benefits, such as higher usage limits and priority support, and is priced at $99/month if billed monthly or $79/month annually.
- Diamond Plan: The Diamond Plan is designed for advanced sellers who require additional features and support. In addition to all the tools available in the Platinum Plan, the Diamond Plan offers higher usage limits, advanced training, and exclusive access to certain features. This is priced at $279/month if billed monthly or $229/month annually.
- Elite Plan: This plan is ideal for high-volume sellers and businesses looking to scale their operations on Amazon and provides access to all tools and features, as well as exclusive benefits such as one-on-one coaching, advanced training, and priority support.
- Custom Plans: For brands and Agencies, you can also contact their sales team for a custom plan to suit your business needs.
You can now use the Helium 10 discount code lifetime to save more on the above premium plans.
Tips To Manage & Secure Your Helium 10 Account
Setting up a Helium 10 account is easy; anyone can do it in a few steps. Protecting your data regarding online tools and data management is essential to ensure uninterrupted services to the platform.
Here are some tips to help you manage and secure your Helium 10 account
- Bookmark Helium 10 website: For easy access to Helium 10, you can easily bookmark the Helium 10 website on your browser. To bookmark your Helium 10, you must do this:
- Press on the Star image on the Search Bar

- Choose a Name and a Folder where you want to bookmark your Helium 10 and Press Done.
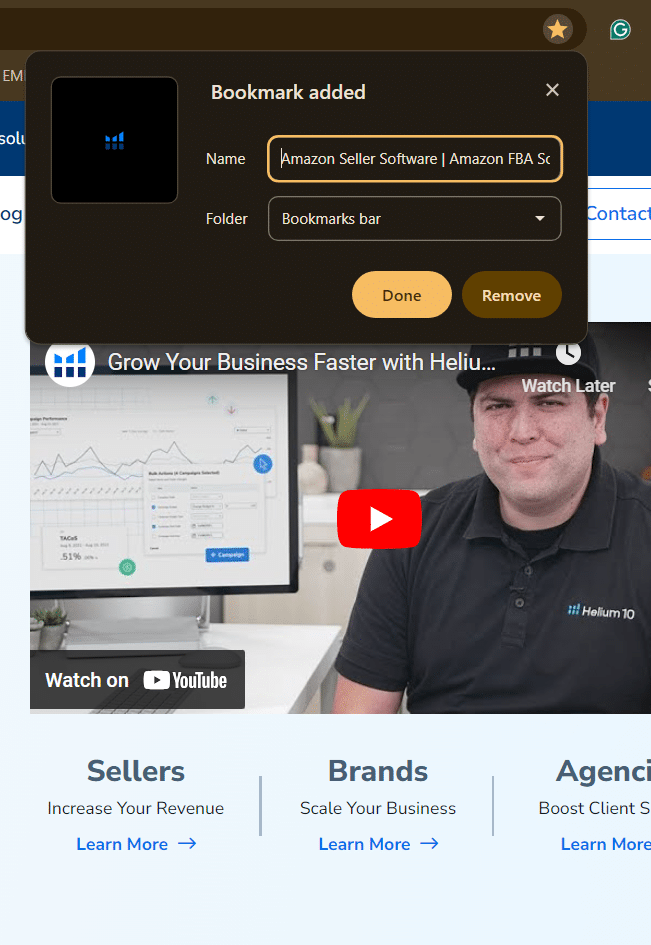
- Now, you can access your account easily whenever you open your browser without visiting the website.
- Use Strong Passwords: Choose a unique and complex password for your Helium 10 account. Avoid using passwords that can be easily guessed, like birthdays or pet names, or reusing passwords from other accounts.
- Enable Two-Factor Authentication: Take advantage of Helium 10’s two-factor authentication feature for an extra layer of security. This typically involves receiving a verification code on your phone or email whenever you log in from a new device or location.
- Regularly Update Your Password: One of the best things you can do is to periodically change passwords to reduce the risk of unauthorized access to your account. You can do it with a reminder once every few months and be assured that your account is protected.
- Monitor Account Activity: You can log in to Helium 10 from multiple devices. Thus, you must monitor your account activity and ensure you do not have logins from unauthorized or unknown devices.
- Use a password manager: With most of your activity now through online tools and services, you need to memorize multiple passwords. If you are anything like me, memorizing passwords can be complex. You should use a trusted Password Manager like Google Password Manager or NordPass to do it for you.
- Contact Support for Assistance: If you encounter issues with your account or suspect unauthorized access, don’t hesitate to contact Helium 10’s customer support for assistance.
With all that being said, you will have no problem logging in or signing up for Hleium 10 if you follow these simple steps. Also, double-check these tips to have a safe and secure experience with Helium 10.
Conclusion (How to login Helium 10)
If you previously had trouble logging in to Helium 10 or creating a new account, I’m confident you can do it independently. Following the straightforward steps in this article, you can easily log in to your Helium 10 account and start enhancing your business on Amazon immediately.
Until next time,
Happy Selling!
Frequently Asked Questions
How do you log in to Helium 10?
To log in to Helium 10, follow these steps: Visit the Helium 10 website> Navigate and Press the Login button> Enter Credentails> Press Login.
How to activate Helium 10 account?
To activate a new Helium 10 account, you need to Sign up. To Sign up to Helium, Visit the Official website>Naviagte and Press Sign Up> Enter Credentials> Press Sign Up>Follow the page Prompts to activate your account.
How to connect Amazon to Helium 10?
To connect Amazon to Helium 10, locate the Connection option in the Helium 10 dashboard and then follow the on-page prompts to link your Amazon account to Helium 10.
What are the steps of Helium 10 sign-up?
To sign up for Helium 10, visit the official Helium 10 website, click the Sign-up button on the top left corner of the page, enter your details, and press Sign Up.